Self-hosted Burp collaborator for fun and profit
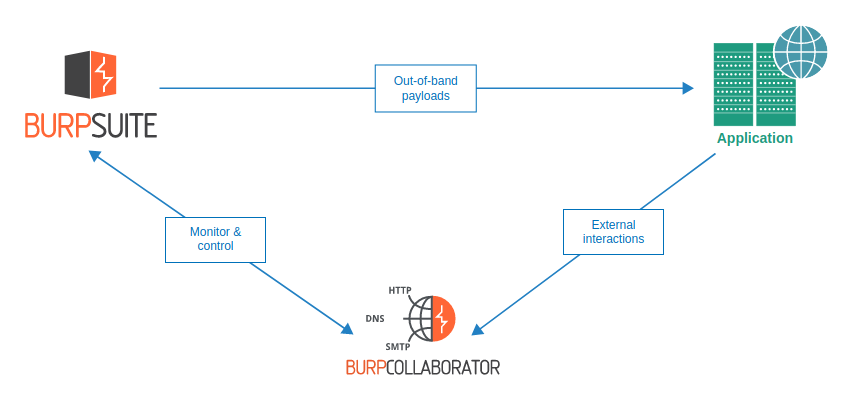
The Burp Suite Collaborator is a valuable tool for penetration testers and bug bounty hunters. It basically gives you unique subdomains and logs all interactions (DNS, HTTP(S), SMTP(S)) towards the subdomains. This can be used for example to detect SSRF-vulnerabilities and exfiltrate data.
Burp Suite Professional provides a collaborator service under the domain burpcollaborator.net and using it is usually fine. However on the rare occasions it can be blacklisted / blocked or otherwise unreachable from the target. Luckily, the Burp collaborator can also be self-hosted and set to use a whole custom domain.
This blog post guides how to set up private Burp Collaborator instance on Amazon AWS and how to configure it to use a whole domain with a free Let’s Encrypt SSL-certificate.
Note: If you’d like to use DigitalOcean instead of AWS, the automation script supports also that (with and without floating IP).
If you’d like to use some completely other IaaS-platform, make sure that the VM’s network interface IP matches the public IP and the script should yet again work.
Step 1: Create AWS Instance and Elastic IP
TL;DR: Create Ubuntu Server 18.04 instance and assign Elastic IP to it. Allow inbound SMTP(S), HTTP(S) and DNS from everywhere and ports 9090&9443 from your own IP.
First we’ll need to create a virtual machine for the Collaborator. Log in to your AWS-account and follow the steps:
- First, lets create the virtual machine.
- Navigate to Instance wizard and select Ubuntu Server 18.04 LTS (HVM), SSD Volume Type.
- Select t2.micro or t3.micro depending on which has the free tier eligible tag on your AWS region. Then click Next: Configure Instance Details.
- Uncheck T2/T3 Unlimited as it might cause some expenses and then click Next: Add Storage.
- Go with default size and click Review and Launch.
- Click Launch.
- Create a new keypair and download it and click Launch instances.
- Next, lets create free-tier eligible Elastic IP. This allows us to always have a static IP which can be linked to AWS virtual machines. Its not required but it makes things easier if you need to re-create your virtual machine.
- Navigate to Allocate new address and click Allocate.
- Go back to the Elastic IP List, right click your Elastic IP, and Associate Address to the virtual machine created in the previous steps.
- Next, go to Instances and click your instance. On bottom of the page, click the Security Group and it should open.
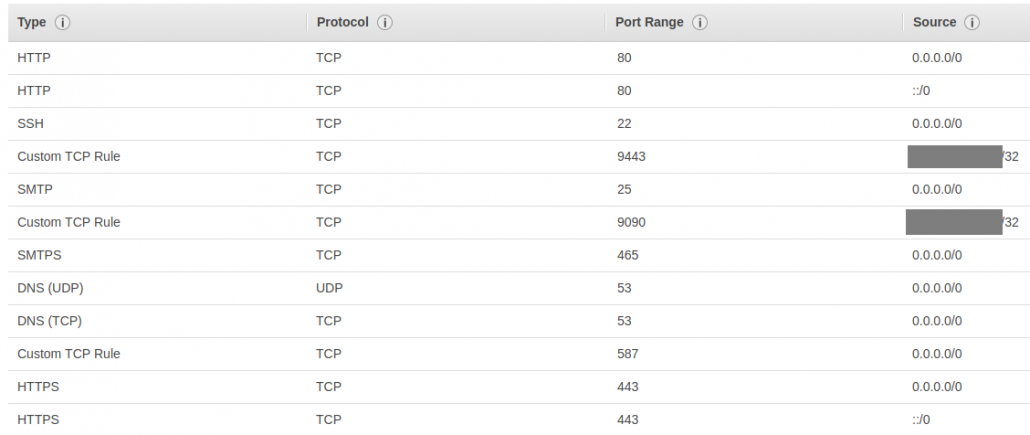
- Create Inbound rules like in the image below. Use your own PC IP for the port 9443 and 9090 as you don’t want anyone else using your collaborator.
Step 2: Configure the collaborator domain
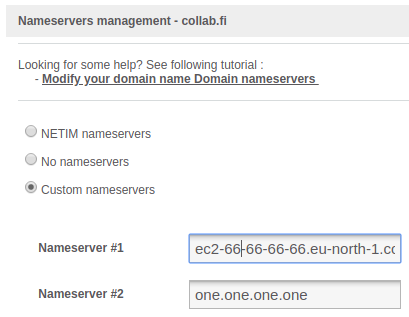
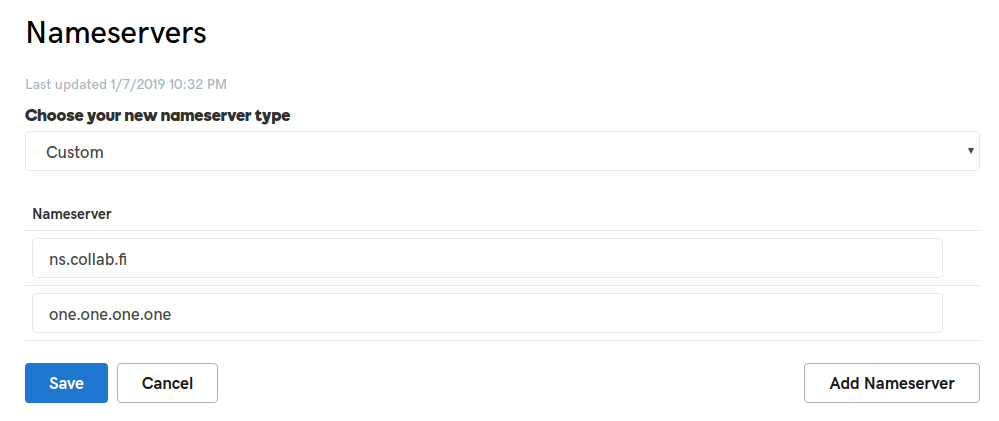
Next we’ll have to configure the domain to have the Elastic IP as nameserver. Most providers require two unique nameservers so we will use one.one.one.one as the second one. If your domain is registered on GoDaddy, see here for GoDaddy-specific instructions, otherwise follow the steps below.
- First, find out hostname for your Elastic IP. You can for example use MxToolbox and it should give you something like ec2-00-00-00-00.eu-north-1.compute.amazonaws.com.
- Next, add nameservers for your collaborator domain in domain registrar settings. Use hostname from the previous step as first nameserver and one.one.one.one as second nameserver:
- Done! All DNS-queries towards your private collaborator domain should now end up in the Elastic IP.
Instructions for domains registered in GoDaddy:
- Go to My Domains on GoDaddy.
- Click the three black dots next to your collaborator domain and then click Manage DNS.
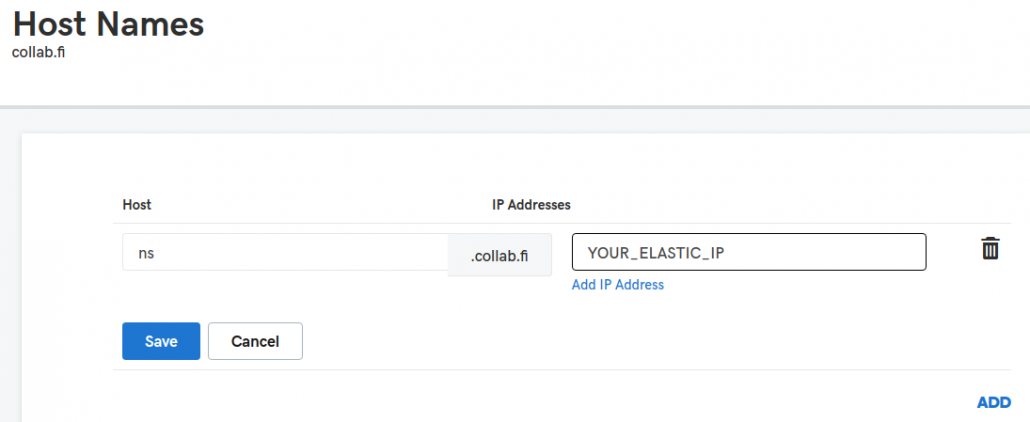
- In Advanced Features section click the Host names.
- Add ns-host with your Elastic IP:
- Next, modify the domain nameservers on the DNS Management page. Select Custom and set ns.YOUR_COLLABORATOR_DOMAIN as first one and one.one.one.one as second one:
- Done! All DNS-queries towards your private collaborator domain should now end up in the Elastic IP.
Step 3: Configure the virtual machine
Next you’ll need to fetch Let’s encrypt certificate and configure the virtual machine and do some other stuff. There’s a script for it so let’s use that. The script also implements automatic certificate renewal so you don’t have to manually renew the Let’s Encrypt every 90 days.
- First, use the keypair you downloaded to log in to the virtual machine:
- chmod 0600 newpair.pem
- ssh -i newpair.pem ubuntu@YOUR_ELASTIC_IP
- Clone the scripts:
- git clone https://github.com/putsi/privatecollaborator && cd privatecollaborator
- Copy your Burp Suite Professional JAR-file to the privatecollaborator-directory.
- scp -i newpair.pem /your/own/pc/burp.jar ubuntu@YOUR_ELASTIC_IP:~/privatecollaborator/
- Run the installer script and place your domain as a command line parameter. The email is for Let’s Encrypt expiry notifications and can either be a valid one or a non-existing one:
- sudo ./install.sh collab.fi your@email.fi
- Accept any package installations that the script suggests and also enter your email address for Lets Encrypt notifications.
- Let’s Encrypt should now succeed creating a certificate for you. If it fails, you can try to run the install-script again couple of times. If it still fails, your domain DNS configuration from earlier steps most likely hasn’t refreshed yet. If that’s not the case, check your domain DNS configuration for typos and also check the security group inbound rules for port 53.
- You can now start the Burp collaborator service.
- sudo service burpcollaborator start
Step 4: Configure Burp Suite
If you didn’t do it already on previous step, start the private collaborator by running: sudo service burpcollaborator start. Then check logs with sudo systemctl status burpcollaborator. It should tell you about listening on various ports and should not show any errors.
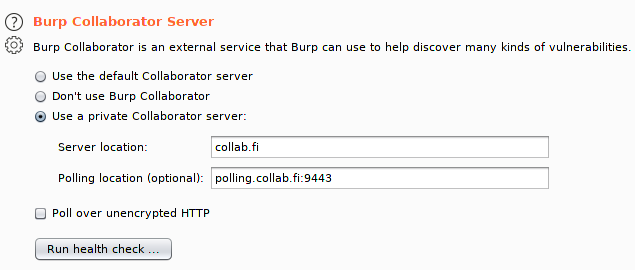
Next start up your Burp Suite and open Project Options -> Misc. Set up the private collaborator config according to the below image, but using your own domain instead of collab.fi:
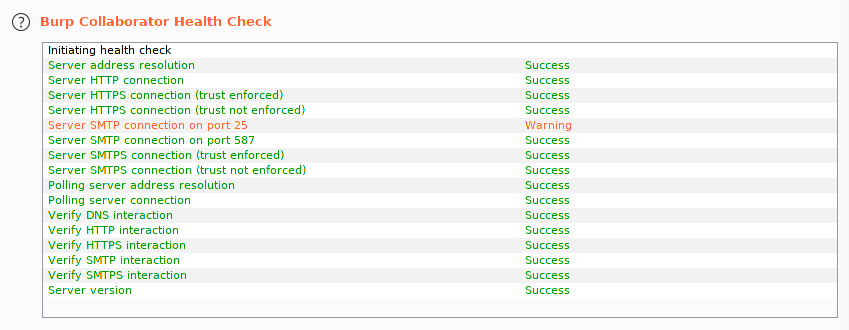
Then click Run health check and wait for results. It should succeed on everything else than inbound SMTP (this is due to AWS policies):
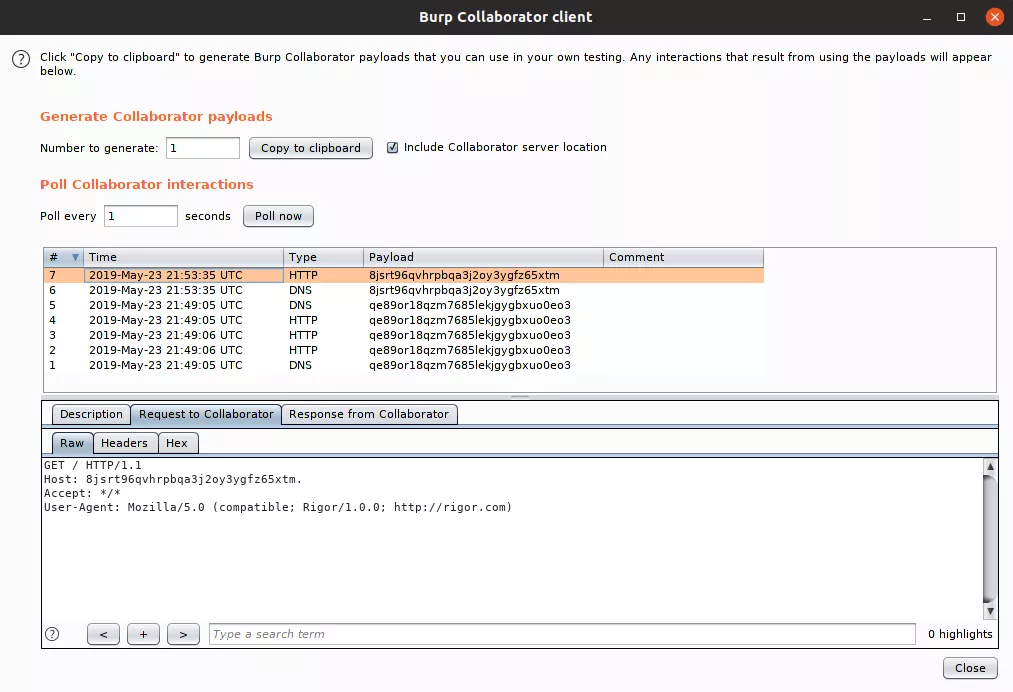
If everything was OK, you should now be able to use the private collaborator instance normally on Burp Suite:
Conclusions
We made it! It works!
Now you can for example add more non-standard ports to the configuration or do whatever else you might imagine.
In the future, this blog post will hopefully be updated on the subject of how to extend the Collaborator. Potential subjects include:
- Capturing interactions for protocols other than DNS, HTTP(S) and SMTP(S).
- Serving custom content as HTTP(S)-response.
- Dockerize the whole process.
- Run as a less-privileged user and properly set iptables redirections.
- Create a single-click setup for AWS.
- Something else? Let us know what you’d like to learn and we will see if we can help.
Over and out –putsi.